

מודול חיישן טמפרטורה דיגיטלי DS18B20
חיישן שעובד בפרוטוקול onewire של דאלאס ופולט ערך דיגיטלי. יש צורך להוריד את ספריית onewire ממנהל הספריות של ארדואינו.
חיבורים:
– > GND בארדואינו
S > פין דיגיטלי בארדואינו
פין אמצעי > 5V בארדואינו
#include <OneWire.h>

// DS18S20 Temperature chip i/o
OneWire ds(10);  // on pin 10

void setup(void) {
  // initialize inputs/outputs
  // start serial port
  Serial.begin(9600);
}

void loop(void) {

  //For conversion of raw data to C
  int HighByte, LowByte, TReading, SignBit, Tc_100, Whole, Fract;

  byte i;
  byte present = 0;
  byte data[12];
  byte addr[8];

  if ( !ds.search(addr)) {
      Serial.print("No more addresses.\n");
      ds.reset_search();
      return;
  }

  Serial.print("R=");
  for( i = 0; i < 8; i++) {
    Serial.print(addr[i], HEX);
    Serial.print(" ");
  }

  if ( OneWire::crc8( addr, 7) != addr[7]) {
      Serial.print("CRC is not valid!\n");
      return;
  }

  if ( addr[0] == 0x10) {
      Serial.print("Device is a DS18S20 family device.\n");
  }
  else if ( addr[0] == 0x28) {
      Serial.print("Device is a DS18B20 family device.\n");
  }
  else {
      Serial.print("Device family is not recognized: 0x");
      Serial.println(addr[0],HEX);
      return;
  }

  ds.reset();
  ds.select(addr);
  ds.write(0x44,1);         // start conversion, with parasite power on at the end

  delay(1000);     // maybe 750ms is enough, maybe not
  // we might do a ds.depower() here, but the reset will take care of it.

  present = ds.reset();
  ds.select(addr);
  ds.write(0xBE);         // Read Scratchpad

  Serial.print("P=");
  Serial.print(present,HEX);
  Serial.print(" ");
  for ( i = 0; i < 9; i++) {           // we need 9 bytes
    data[i] = ds.read();
    Serial.print(data[i], HEX);
    Serial.print(" ");
  }
  Serial.print(" CRC=");
  Serial.print( OneWire::crc8( data, 8), HEX);
  Serial.println();

  //Conversion of raw data to C
  LowByte = data[0];
  HighByte = data[1];
  TReading = (HighByte << 8) + LowByte;
  SignBit = TReading & 0x8000;  // test most sig bit
  if (SignBit) // negative
  {
    TReading = (TReading ^ 0xffff) + 1; // 2's comp
  }
  Tc_100 = (6 * TReading) + TReading / 4;    // multiply by (100 * 0.0625) or 6.25

  Whole = Tc_100 / 100;  // separate off the whole and fractional portions
  Fract = Tc_100 % 100;


  if (SignBit) // If its negative
  {
     Serial.print("-");
  }
  Serial.print(Whole);
  Serial.print(".");
  if (Fract < 10)
  {
     Serial.print("0");
  }
  Serial.print(Fract);

  Serial.print("\n");
  //End conversion to C
 }
מודול חיישן נטייה
חיישן נטייה בסיסי שיכול גם לשמש כחיישן תנודה.
חיבורים:
– > GND בארדואינו
פין אמצעי > 5V בארדואינו
S > פין דיגיטלי בארדואינו
int Led = 13 ;// define LED Interface
int buttonpin = 3; // define the tilt switch sensor interfaces
int val;// define numeric variables val
void setup ()
{
  Serial.begin(9600);
  pinMode (Led, OUTPUT) ;// define LED as output interface
    pinMode (buttonpin, INPUT) ;//define the output interface tilt switch sensor
}
void loop ()
{
  val = digitalRead (buttonpin) ;// digital interface will be assigned a value of 3 to read val
  Serial.println(val);
    if (val == HIGH) //When the tilt sensor detects a signal when the switch, LED flashes
  {
    digitalWrite (Led, HIGH);
  }
  else
  {
    digitalWrite (Led, LOW);
  }
  delay(30);
}
מודול חיישן HALL מגנטי
חיישן מגנטי אפקט HALL לזיהוי של מגנטים.
חיבורים: – > GND בארדואינו
אמצעי > 5V בארדואינו
S > פין דיגיטלי בארדואינו
int Led = 13 ; // define LED Interface
int buttonpin = 3; // define the Reed sensor interfaces
int val ; // define numeric variables val
void setup ()
{
  pinMode (Led, OUTPUT) ; // define LED as output interface
  pinMode (buttonpin, INPUT) ; // output interface as defined Reed sensor
}
void loop (){
  val = digitalRead (buttonpin) ; // digital interface will be assigned a value of 3 to read val
  if (val == HIGH) // When the Reed sensor detects a signal, LED flashes
  {
    digitalWrite (Led, HIGH);
  }
  else
  {
    digitalWrite (Led, LOW);
  }
}
מודול חיישן כפתור
חיבורים:
– > GND בארדואינו
אמצעי > 5V בארדואינו
S > פין דיגיטלי בארדואינו
int Led = 13 ;// define LED Interface
int buttonpin = 3; // define the key switch sensor interface
int val ;// define numeric variables val
void setup ()
{
  pinMode (Led, OUTPUT); // define LED as output interface
  pinMode (buttonpin, INPUT); // define the key switch sensor output interface
}
void loop ()
{
  val = digitalRead (buttonpin); // digital interface will be assigned a value of 3 to read val
    if (val == HIGH)  // When the key switch when the sensor detects a signal, LED flashes
  {
    digitalWrite (Led, HIGH);
  }
  else
  {
    digitalWrite (Led, LOW);
  }
}
מודול חיישן מקלט אינפרה אדום
מקלט אינפרה אדום בתדר 38Khz שיכול לעבוד עם רוב השלטים הקיימים וגם לקבל תדר מהנורת אינפרה אדום הנמצאת בערכה. יש צורך להוריד את חבילת IRremote מסביבת העבודה של הארדואינו.
חיבורים:
– > GND בארדואינו
אמצעי > 5V בארדואינו
S > פין 11 בארדואינו
#include <IRremote.h>

int RECV_PIN = 11;

IRrecv irrecv(RECV_PIN);

decode_results results;

void setup()
{
  Serial.begin(9600);
  irrecv.enableIRIn(); // Start the receiver
}
void loop() {
  if (irrecv.decode(&results)) {
    Serial.println(results.value, HEX);
    irrecv.resume(); // Receive the next value
  }
}
מודול חיישן זמזם פסיבי
זמזם פסיבי שכדי להפעיל אותו צריך לתת פולסים במרווחים שונים בשונה מזמזם אקטיבי שרק דורש זרם. אפשר גם להשתמש בפונקציית tone שנמצאת בארדואינו.
חיבורים:
– > GND בארדואינו
אמצעי > 5V בארדואינו
S > פין דיגיטלי בארדואינו
int buzzer = 3 ;// setting controls the digital IO foot buzzer
void setup ()
{
  pinMode (buzzer, OUTPUT) ;// set the digital IO pin mode, OUTPUT
}
void loop ()
{
  unsigned char i, j ;// define variables
  while (1)
  {
    for (i = 0; i <80; i++) //  a frequency sound
    {
      digitalWrite (buzzer, HIGH) ;// send voice
      delay (1) ;// Delay 1ms
      digitalWrite (buzzer, LOW) ;// do not send voice
      delay (1) ;// delay ms
    }
    for (i = 0; i <100; i++) //  another frequency sound
    {
      digitalWrite (buzzer, HIGH) ;// send voice
      delay (2) ;// delay 2ms
      digitalWrite (buzzer, LOW) ;// do not send voice
      delay (2) ;// delay 2ms
    }
  }
}
מודול נורת לד 3W
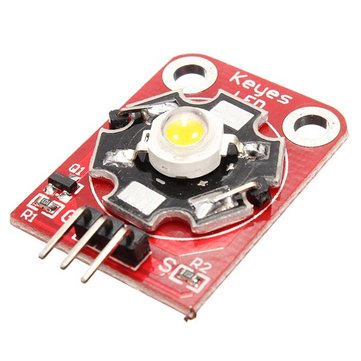
נורה חזקה שיכולה להפיק 3W ולשמש כנורת קריאה או לשימוש אחר.
זהירות: לא להסתכל על הנורה לזמן ממושך ולשים לב שהיא לא מתחממת או לחבר ממיר חום.
חיבורים:
– > GND בארדואינו
אמצעי > 5V בארדואינו
S > פין דיגיטלי בארדואינו
int led = 3; // 3W led;
void setup ()
{
  pinMode (led, OUTPUT); // Define port attribute is output;
}
void loop ()
{
  digitalWrite (led, HIGH); // led conduction;
  delay (2000);
  digitalWrite (led, LOW); // led switch is turned off;
  delay (2000);
}
מודול ממסר
ממסר פשוט עם חיבורים ל NO ול NC .
חיבורים:
– > GND בארדואינו
אמצעי > 5V בארדואינו
S > פין דיגיטלי בארדואינו
int relay = 3; // relay turns trigger signal - active high;
void setup ()
{
  pinMode (relay, OUTPUT); // Define port attribute is output;
}
void loop ()
{
  digitalWrite (relay, HIGH); // relay conduction;
  delay (1000);
  digitalWrite (relay, LOW); // relay switch is turned off;
  delay (1000);
}
מודול RTC

מבוסס על שעון DS1307 ועובד על בטריית CR2032 או CR2025. מתקשר עם הארדואינו בפרוטוקול I2C ולכן יש צורך להשתמש בספריית WIRE וגם ב RTCLIB.
חיבורים: סה”כ 4 חוטים.
SCL > בארדואינו A5
SDA > בארדואינו A4
VCC > בארדואינו 5V
GND > בארדואינו GND
#include <Wire.h>
#include "RTClib.h"
RTC_DS1307 RTC;

void setup () {
    Serial.begin(9600);
    Wire.begin();
    RTC.begin();
  if (! RTC.isrunning()) {
    Serial.println("RTC is NOT running!");
    // following line sets the RTC to the date & time this sketch was compiled
    RTC.adjust(DateTime(__DATE__, __TIME__));
  }
}
void loop () {
    DateTime now = RTC.now();
    Serial.print(now.year(), DEC);
    Serial.print('/');
    Serial.print(now.month(), DEC);
    Serial.print('/');
    Serial.print(now.day(), DEC);
    Serial.print(' ');
    Serial.print(now.hour(), DEC);
    Serial.print(':');
    Serial.print(now.minute(), DEC);
    Serial.print(':');
    Serial.print(now.second(), DEC);
    Serial.println();
    delay(1000);
}
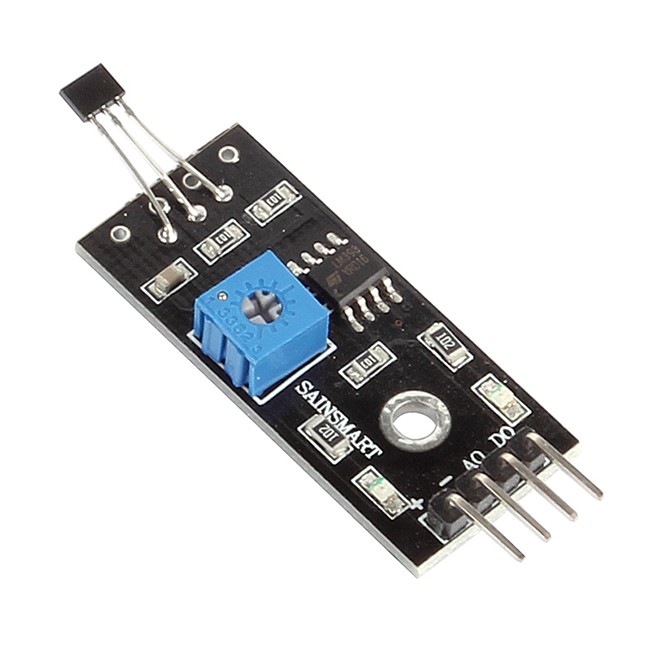
מודול חיישן המנעות מעצמים

חיישן זה הוא חיישן קרבה שעובד על שתי נורות אינפרה אדום ויעיל למרחקים 2-40 ס”מ. בעזרת הבורג השמאלי ניתן לשנות את סף המרחק מהעצמים . כשהחיישן מגלה עצם הוא מוציא מתח מפין S.
חיבורים:
– > GND בארדואינו
פין אמצעי > 5V בארדואינו
S > פין דיגיטלי בארדואינו
EN > אפשרות להדליק ולכבות את הזיהוי
בורג שמאלי > שינוי סף המרחק
בורג ימני > יכול למנוע הפרעות בתדר, עדיף לא לשנות אותו.
int Led = 13 ;// define LED Interface
int buttonpin = 3; // define the obstacle avoidance sensor interface
int val ;// define numeric variables val
void setup ()
{
  pinMode (Led, OUTPUT) ;// define LED as output interface
  pinMode (buttonpin, INPUT) ;// define the obstacle avoidance sensor output interface
}
void loop ()
{
  val = digitalRead (buttonpin) ;// digital interface will be assigned a value of 3 to read val
  if (val == HIGH) // When the obstacle avoidance sensor detects a signal, LED flashes
  {
    digitalWrite (Led, HIGH);
  }
  else
  {
    digitalWrite (Led, LOW);
  }
}
מודול חיישן טמפרטורה ולחות DHT11
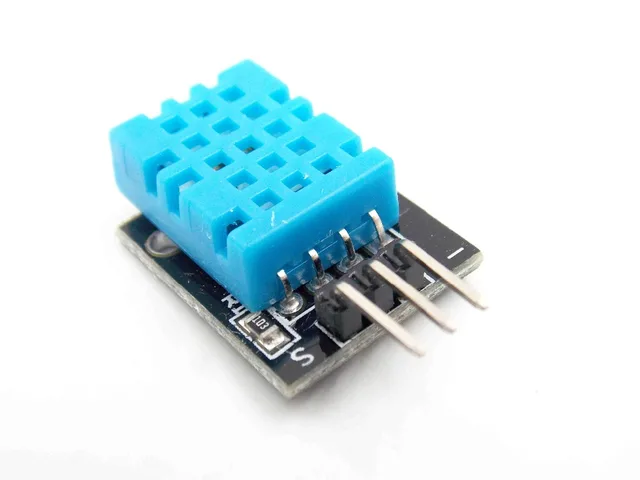
חיישן טמפרטורה ולחות בסיסי ופשוט שעושה את העבודה אם לא צריך זיהוי מדויק מדי. אפשר להפעיל אותו עם הקוד בדף זה או עם ספרייה ייעודית מספריות הארדואינו.
חיבורים:
– > GND בארדואינו
אמצעי > 5V בארדואינו
S > פין דיגיטלי בארדואינו
int DHpin = 3;
byte dat [5];
byte read_data () {
  byte data;
  for (int i = 0; i < 8; i ++) {
    if (digitalRead (DHpin) == LOW) {
      while (digitalRead (DHpin) == LOW); // wait for 50us
      delayMicroseconds (30); // determine the duration of the high level to determine the data is '0 'or '1'
      if (digitalRead (DHpin) == HIGH)
        data |= (1 << (7-i)); // high front and low in the post
      while (digitalRead (DHpin) == HIGH); // data '1 ', wait for the next one receiver
     }
  }
return data;
}

void start_test () {
  digitalWrite (DHpin, LOW); // bus down, send start signal
  delay (30); // delay greater than 18ms, so DHT11 start signal can be detected

  digitalWrite (DHpin, HIGH);
  delayMicroseconds (40); // Wait for DHT11 response

  pinMode (DHpin, INPUT);
  while (digitalRead (DHpin) == HIGH);
  delayMicroseconds (80); // DHT11 response, pulled the bus 80us
  if (digitalRead (DHpin) == LOW);
  delayMicroseconds (80); // DHT11 80us after the bus pulled to start sending data

  for (int i = 0; i < 4; i ++) // receive temperature and humidity data, the parity bit is not considered
    dat[i] = read_data ();

  pinMode (DHpin, OUTPUT);
  digitalWrite (DHpin, HIGH); // send data once after releasing the bus, wait for the host to open the next Start signal
}

void setup () {
  Serial.begin (9600);
  pinMode (DHpin, OUTPUT);
}

void loop () {
  start_test ();
  Serial.print ("Current humdity =");
  Serial.print (dat [0], DEC); // display the humidity-bit integer;
  Serial.print ('.');
  Serial.print (dat [1], DEC); // display the humidity decimal places;
  Serial.println ('%');
  Serial.print ("Current temperature =");
  Serial.print (dat [2], DEC); // display the temperature of integer bits;
  Serial.print ('.');
  Serial.print (dat [3], DEC); // display the temperature of decimal places;
  Serial.println ('C');
  delay (700);
}
מודול חיישן זמזם אקטיבי
זמזם אקטיבי שדורש מתח משתנה להפעלה , אפשר גם להפעילו עם פונקציית TONE בארדואינו.
חיבורים:
– > GND בארדואינו
אמצעי > 5V בארדואינו
S > פין דיגיטלי בארדואינו
int speakerPin = 3;
void setup () {
  pinMode (speakerPin, OUTPUT);
}
void loop () {
  analogWrite (speakerPin, 255);
  delay (50);
  analogWrite (speakerPin, 0);
  delay (10);
}
מודול חיישן להבה
חיישן שקולט אורך גל שבין 760-1100 ננומטר שנפלט מלהבת אש או מהשמש. אפשר להפעילו בצורה דיגיטלית או אנלוגית ולכוון את סף הזיהוי שלו.
חיבורים:
G > בארדואינו GND
+ > 5V בארדואינו
D0 > פין דיגיטלי בארדואינו
A0 > פין אנלוגי בארדואינו
int Led = 13 ;// define LED Interface
int buttonpin = 3; // define the flame sensor interface
int analoog = A3; // define the flame sensor interface

int val ;// define numeric variables val
float sensor; //read analoog value

void setup ()
{
  pinMode (Led, OUTPUT) ;// define LED as output interface
  pinMode (buttonpin, INPUT) ;// output interface defines the flame sensor
  pinMode (analoog, INPUT) ;// output interface defines the flame sensor
  Serial.begin(9600);
}

void loop ()
{
  sensor = analogRead(analoog);
  Serial.println(sensor);  // display tempature

  val = digitalRead (buttonpin) ;// digital interface will be assigned a value of 3 to read val
    if (val == HIGH) // When the flame sensor detects a signal, LED flashes
  {
    digitalWrite (Led, HIGH);
  }
  else
  {
    digitalWrite (Led, LOW);
  }
  delay(1000);
}
מודול חיישן לייזר
פולט קרן לייזר באורך גל של 650 ננומטר.
זהירות: נא לא להסתכל ישירות על הקרן לאורך זמן.
חיבורים:
– > GND בארדואינו
אמצעי > 5V בארדואינו
S > פין דיגיטלי בארדואינו
void setup ()
{
   pinMode (13, OUTPUT); // define the digital output interface 13 feet
}
void loop () {
   digitalWrite (13, HIGH); // open the laser head
   delay (1000); // delay one second
   digitalWrite (13, LOW); // turn off the laser head
   delay (1000); // delay one second
}
מודול חיישן ריד מגנטי

החיישן סוגר מעגל שהוא חש מגנט בקרבתו.
חיבורים:
– > GND בארדואינו
אמצעי > 5V בארדואינו
S > פין דיגיטלי בארדואינו
int Led = 13 ; // define LED Interface
int buttonpin = 3; // define the Reed sensor interfaces
int val ; // define numeric variables val
void setup ()
{
  pinMode (Led, OUTPUT) ; // define LED as output interface
  pinMode (buttonpin, INPUT) ; // output interface as defined Reed sensor
}
void loop ()
SunFounder{
  val = digitalRead (buttonpin) ; // digital interface will be assigned a value of 3 to read val
  if (val == HIGH) // When the Reed sensor detects a signal, LED flashes
  {
    digitalWrite (Led, HIGH);
  }
  else
  {
    digitalWrite (Led, LOW);
  }
}
מודול חיישן קול

חיישן שסוגר מעגל כשהוא מזהה קול בסביבה. אפשר לשנות את רף הזיהוי ע”י הפוטנציומטר שסיבוב שמאלה מוריד את הרף וסיבוב ימינה מעלה אותו, הוא צריך להיות בערך על 10K כדי לעבוד ביעילות. ניתן להפעילו בצורה אנלוגית או דיגיטלית.
חיבורים:
– > GND בארדואינו
אמצעי > 5V בארדואינו
D0 > פין דיגיטלי בארדואינו
A0 > פין אנלוגי בארדואינו
int Led = 13 ;// define LED Interface
int buttonpin = 3; // define D0 Sensor Interface
int val = 0;// define numeric variables val

void setup ()
{
  pinMode (Led, OUTPUT) ;// define LED as output interface
  pinMode (buttonpin, INPUT) ;// output interface D0 is defined sensor
}

void loop ()
{
  val = digitalRead(buttonpin);// digital interface will be assigned a value of pin 3 to read val
  if (val == HIGH) // When the sound detection module detects a signal, LED flashes
  {
    digitalWrite (Led, HIGH);
  }
  else
  {
    digitalWrite (Led, LOW);
  }
}
מודול חיישן אור LDR
חיישן פוטו-רסיסטור שמשנה את ההתנגדות שלו לפי כמות האור שהוא חש.
חיבורים:
– > GND בארדואינו
אמצעי > 5V בארדואינו
S > פין אנלוגי בארדואינו
int sensorPin = A5; // select the input pin for the potentiometer
int ledPin = 13; // select the pin for the LED
int sensorValue = 0; // variable to store the value coming from the sensor
void setup() {
  pinMode(ledPin, OUTPUT);
  Serial.begin(9600);
}
void loop() {
  sensorValue = analogRead(sensorPin);
  digitalWrite(ledPin, HIGH);
  delay(sensorValue);
  digitalWrite(ledPin, LOW);
  delay(sensorValue);
  Serial.println(sensorValue, DEC);
}
מודול נורת אינפרה אדום
מודול נורת אינפרה אדום שמשדרת בתדר 38Khz ויכולה לשלוט על מוצרי אלקטרוניקה שונים וגם לתקשר עם הרסיבר המסופק בערכה. יש צורך להשתמש בספריית IRremote שנמצאת במנהל הספריות של ארדואינו.
חיבורים:
– > GND בארדואינו
אמצעי > 5V בארדואינו
S > פין דיגיטלי בארדואינו
#include <IRremote.h>
IRsend irsend;
int RECV_PIN = 11; // define input pin on Arduino
IRrecv irrecv (RECV_PIN);
decode_results results;
void setup (){
Serial.begin (9600);
irrecv.enableIRIn (); // Start the receiver
}
void loop () {
if (irrecv.decode (& results)) {
Serial.println (results.value, HEX);
irrecv.resume (); // Receive the next value
}


for (int i = 0; i <50; i++) {
irsend.sendSony (0xa90, 12); // Sony TV power code
delay (40);
}
}
מודול נורת לד RGB

נורת לד 3 צבעים RGB שכל פין הוא צבע אחר – אדום ירוק וכחול. ניתן לשלב בין הצבעים ולהגיע כמעט לכל צבע אפשרי.
חיבורים:
R > פין דיגיטלי בארדואינו
G > פין דיגיטלי בארדואינו
B > פין דיגיטלי בארדואינו
– > GND בארדואינו
int redpin = 11; // select the pin for the red LED
int bluepin = 10; // select the pin for the blue LED
int greenpin = 9 ;// select the pin for the green LED
int val;
void setup () {
  pinMode (redpin, OUTPUT);
  pinMode (bluepin, OUTPUT);
  pinMode (greenpin, OUTPUT);
  Serial.begin (9600);
}
void loop ()
{
  for (val = 255; val> 0; val --)
  {
    analogWrite (11, val);
    analogWrite (10, 255-val);
    analogWrite (9, 128-val);
    delay (10);
    Serial.println (val, DEC);
  }
  for (val = 0; val <255; val ++)
  {
    analogWrite (11, val);
    analogWrite (10, 255-val);
    analogWrite (9, 128-val);
    delay (10);
    Serial.println (val, DEC);
  }
}
מודול כוס קסומה
שתי מודולים שמדגימים קבלת קלט שמגיע מתזוזת הכספית, והוצאת פלט של PWM.
חיבורים: סה”כ 8 חוטים לשתי המודולים.
G > GND בארדואינו
+ > 5V או 3.3V
S > פין דיגיטלי בארדואינו שמקבל קלט מתזוזת הכספית
L > פין PWM בארדואינו שמעמעם את הנורה
int LedPinA = 5;
int LedPinB = 6;
int ButtonPinA = 7;
int ButtonPinB = 4;
int buttonStateA = 0;
int buttonStateB = 0;
int brightness = 0;
void setup ()
{
  pinMode (LedPinA, OUTPUT);
  pinMode (LedPinB, OUTPUT);
  pinMode (ButtonPinA, INPUT);
  pinMode (ButtonPinB, INPUT);
}
void loop ()
{
  buttonStateA = digitalRead (ButtonPinA);
  if (buttonStateA == HIGH && brightness != 255)
  {
    brightness + +;
  }
  buttonStateB = digitalRead (ButtonPinB);
  if (buttonStateB == HIGH && brightness != 0)
  {
    brightness --;
  }
  analogWrite (LedPinA, brightness); // adjust brightness in cup1
  analogWrite (LedPinB, 255 - brightness);adjust brightness in cup2
  delay (25);
}
מודול חיישן קיבול
חיישן שמזהה נגיעה או מוליך אחר בטווח קצר על ידי שינוי בשדה המגנטי שלו. ניתן לשנות את סף הזיהוי ע”י הפוטנציומטר וגם לחבר בצורה אנלוגית או דיגיטלית.
חיבורים:
G > בארדואינו GND
+ > 5V בארדואינו
D0 > פין דיגיטלי בארדואינו
A0 > פין אנלוגי בארדואינו
int Led = 13 ; // define LED Interface
int buttonpin = 3; // define Metal Touch Sensor Interface
int val ; // define numeric variables val
void setup ()
{
  pinMode (Led, OUTPUT) ; // define LED as output interface
  pinMode (buttonpin, INPUT) ; // define metal touch sensor output interface
}
void loop ()
{
  val = digitalRead (buttonpin) ; // digital interface will be assigned a value of 3 to read val
  if (val == HIGH) // When the metal touch sensor detects a signal, LED flashes
  {
    digitalWrite (Led, HIGH);
  }
  else
  {
    digitalWrite (Led, LOW);
  }
}
מודול חיישן רעידה
חיישן זה הוא חיישן נקישה או רעידה שמסוגל לזהות נקישות או זעזועים בקרבתו.
חיבורים:
– > GND
אמצעי > 5V בארדואינו
S > פין דיגיטלי בארדואינו
int Led = 13 ; // define LED Interface
int Shock = 3; // define the percussion Sensor Interface
int val ; // define numeric variables val

void setup ()
{
  pinMode (Led, OUTPUT) ; // define LED as output interface
  pinMode (Shock, INPUT) ; // define knock sensor output interface
}
void loop ()
{
  val = digitalRead (Shock) ; // read digital interface is assigned a value of 3 val
  if (val == HIGH) // When the percussion when the sensor detects a signal, LED flashes
  {
    digitalWrite (Led, LOW);
  }
  else
  {
    digitalWrite (Led, HIGH);
  }
}
מודול חיישן עוקב קו
חישן זה מסוגל לעקוב אחרי קו על ידי זיהוי החזר האור המגיע מעצם מסוים. ככל שעצם הוא יותר לבן הוא מחזיר יותר אור בעוד עצמים שחורים בולעים אותו , לכן חיישן מסוג זה נמצא בשימוש ברובוטיקה ומסוגל לעקוב אחרי פס לבן.
חיבורים:
– > GND בארדואינו
אמצעי > 5V בארדואינו
S > פין דיגיטלי בארדואינו
int lineSensorPin = 2;
/* Initialise serial and DIO */
void setup()
{
  /* Setup the serial port for displaying the status of the sensor */
  Serial.begin(9600);

  /* Configure the DIO pin the sensor will be connected to as an input */
  pinMode(lineSensorPin, INPUT);
}


/* Main program loop */
void loop()
{
  /* If the DIO pin is pulled low then an object has been detected */
  if (!digitalRead(lineSensorPin))
    Serial.println("Object detected !");
}